I think one of the trickiest parts of traveling with babies, toddlers and young kids is being prepared for meal times. My son is almost 2 years old and while it’s getting easier to find food outside the home that he can easily eat, each meal is still something I have to think about, plan and prepare for.
I want to break this post down by age group because meal and feeding requirements for babies, toddlers and young kids differ a lot.
Newborn – 6 months old
During this phase most babies are mostly on milk and/or formula so actually it’s not too difficult to plan “what” to feed your child. The tricky part is the “how”, especially on flights and long days out and about.
The first thing to know is you are allowed to take as much milk, formula and water as you think you will need for your baby on flights. The rules for bringing liquids on a plane do not apply to moms with babies. Some airlines have rules about bringing hot water on board but do not worry you can always ask for hot water on the plane as and when you need it; it’s always good to check with your airline what the rules are for hot water.
If you’re traveling with breastmilk, pack a cooler bag with ice packs and easily take frozen bags of breastmilk and bottles with pumped milk wherever you go. Breastmilk tends to stay fresh with ice packs in a cooler bag for up to 24 hours and you can always re-freeze any extra milk for longer storage once you reach your final destination. While on flights and long days out and about, I kept my frozen breast milk as well as milk in bottles ready-to-drink in a cooler bag with ice packs. And if you’re traveling with formula then I’d make sure to prepare about 4 formula feeds in a separate container and keep room temperature water in a few bottles separately. On flights and on-the-go to warm up the milk or formula, I kept a large and wide travel coffee mug with a screw off top in my diaper bag that I could easily fit my son’s milk bottles in. So what I would do is simply ask for hot water wherever I am (flight, hotel, restaurant, cafe etc) and put the bottle in the travel coffee mug and warm the milk quickly.
If you’re a first time mom traveling with a baby and/or it’s a first flight with a baby, read this post for more specific tips and tricks.
-
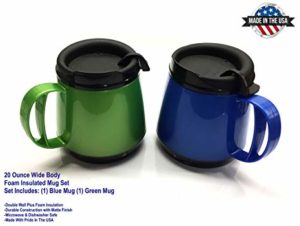
- Wide Neck Travel Mug
6 months – 1 year old
Once my son was about 6 months he started on solids and then the “what” of meal prep on-the-go became the tricky part. While traveling, my son was basically on a diet of mashed banana (alternated with avocado if available) mixed into Nestle Cerelac instant baby cereal for breakfast. Bananas are easily available anywhere and everywhere so it’s a really easy and filling breakfast meal.
For lunch and dinner, to keep things simple I opted for ready-made pureed food or carried portions of rice cooked with either veggies and lentils/rice congee. On flights baby meals are available but I think it’s wise to err on the side of caution and keep extra jars of baby food you know your baby likes (and be sure to introduce it well before you travel so can see if baby likes it or not).
While traveling I always opted to stay in a hotel or serviced apartment with a kitchen/kitchenette so I could cook fresh meals for my son. I chose to pack some rice, lentils (moong daal) and dry spices as well as a portable steamer/blender in my suitcase so I can quickly whip up a meal in case I had to. It’s important to mention that rice cannot be cooked in a steamer/blender — it’s mainly used to steam and blend veggies. But I also used it to blend cooked food into a puree form. Most hotels are happy to prepare baby meals if guided, so I find rice congee or rice and tomato soup a very easy option. And worst case: buy whatever you need from local supermarkets while traveling. I think the key is to ensure you have access to a kitchen and fridge so you are prepared for all scenarios. At this age babies don’t eat that much, so I cooked and blended a large amount of food once a day and split it into two meals and stored them in separate containers.
Here’s a feeding hack that worked for me: whenever I was out and about with Kiaan and knew he would eat in the next two hours or so, I carried his refrigerated cold food and let it get to room temperature on its own and that way I easily fed him without having to worry about warming up his food each time. The trick is to get your baby used to room temperature food and milk beforehand and it’s a huge lifesaver if they take to it.

Philips Avent 4-in-1 Baby Food Maker
1 year old to 18 months
Most of the tips from the 6 months to 1 year age group applies to this age group too; I think the only major change is that I stopped carrying a steamer/blender because my son began eating soft foods that didn’t require blending.
For breakfast, I introduced quick cook oats boiled with milk and added some mashed banana or avocado to it. Quick cook oats are also very easy to travel with and cook on-the-go if you have access to a kitchen.
For lunch and dinner, I stuck to a steady diet of rice cooked with veggies and lentils, rice congee, and fried rice and tomato soup following the tips mentioned before. I did find that my son started eating larger quantities and so I switched to carrying his meals in a larger food container. I like this Skip Hop Food Jar because it is pretty compact, keeps food warm for long periods of time if needed and comes with a spork attached, which is super helpful to feed all kinds of food and fruits.

Skip Hop Food Jar
My son also moved to fresh cow’s milk at 1 year old so I began carrying long-life UHT milk boxes in my diaper bag whenever we are traveling. These make life so easy because they can be stored at room temperature and if your baby is used to drinking milk at that temperature you can feed them anywhere. If I’m not sure I’ll get fresh milk easily wherever I am or don’t want the hassle of having to warm up milk for each feed, I’ll simply pack enough boxes of UHT milk for my trip and it makes life so much easier on-the-go.

Thai-Denmark UHT Long-life Milk
18 months onwards
At this point my son’s teeth (and taste buds!) had developed enough for him to eat food and snacks prepared outside home so it made it a bit easier when we were traveling or out; I didn’t always have to prepare his food from home if I knew there were options for him. And if not, then the tips and tricks mentioned above still apply.
I introduced things like yogurt, cheese and organic veggie snacks bought from the store as snack options.
To give my son some variety (and make my life easier) I introduced pasta with tomato sauce, macaroni and cheese, daal and rice and roti/paratha with pumpkin/sweet potato with some greens cooked Indian style in addition to what he was already eating before. This way we have enough food choices for my son when we’re traveling.
I hope you found the tips and tricks above helpful. Let me know your comments and questions below.